Copy of Article Text Below
General Info
The Fiesta is designed to need the minimum of attention, and the few service points are made as simple as possible.
If you own the 950 or 1100 model you'll find that the plugs need a smaller 5/8 AF spark plug spanner. The recommended plug type is the Motorcraft AGRF 22. These have tapered seats and only need to be nipped up lightly. The 1300 retains a normal pattern plug, Motorcraft AGR 12.
The rear drum brakes are self-adjusting but the handbrake cable should be checked periodically for adjustment. There is a central cable adjustment sleeve, and this is tightened by releasing the lock nut on the end of the body and screwing the small nut shape section on the end of the thread in a clock-wise direction. Take up the slack until the backplate levers just begin to move and then give it three more full turns. Grease the cable at all guide and pulley contact points.
Carburettors fitted with a tamper-proot plug need either a self-tapper or a wood screw to extract them. You will need to grind the tip of the screw flat to avoid damaging the head of the mixture screw.
Lubricants
Engine: 5.75 pts (inc. filter) SAE 20W/40 or 50
Gearbox: 5 pints EP gear oil SAE 80
Wheelbearings/general greasing: Lithium grease
Steering rack: Ford fluid grease SAM 1C-9106A
Brake fluid: SAE J1703/c or ESEA-M6C-1001A
Antifreeze: 25 per cent mixture requires just under 2.5 pints (protection to minus 11ºC).
Tools required
10 to 22mm spanners and sockets and plug spanner. Pliers
Flat-blade and cross-point screwdrivers
Feeler gauges
Strobe or static timing light
0i1 drain tin and filter canister wrench
Jack and axle stands
Oiling can and tyre pressure gauge
Parts required
(plus approx. prices)
Plugs - £4.40
Points - £1.13
Air filter - £4.00
Oil filter - £3.75
Rocker box gasket - £0.55
Plus lubricants etc.
Clutch *
There's not much to say about the clutch because the pedal mechanism controlling the cable has a built-in ratchet device which keeps the adjustment at the correct level.
It's worth giving the cable a shot of WD-40 to keep it working freely, and it's a good idea to check for any signs of fraying on the exposed part of the inner cable.
If the operation'becomes stiff, renew the cable without delay.
Transmission **
Check around the casing for leaks and leave the car to stand for at least ten minutes on level ground before checking the filler/level plug on the top of the gearbox.
Any serious loss must mean there's a leak somewhere and this should be checked.
The oil level should reach the bottom thread of the plug hole.
Electrics *
Loosen bracket bolts slightly on the alternator plus adjustment bolt. The alternator can be gently levered with a hammer handle to get the correct Viin free play on the longest run of the belt. Check belt regularly for cuts and wear. Regular checks of the battery electrolyte level are also essential.
Lights should be regularly checked but alignment of the headlamps is best left to your dealer.
Coolant *
If there's been a noticeable loss of coolant in the tank, you may need to remove the radiator cap (engine cold) and top up here as well as the container. Check for signs of leaking around hoses etc., especially if antifreeze has recently been added to the system.
The tank has upper and lower levels, and the level must be checked regularly. The 1300 tank is on the bulkhead.
Tappets **
The 'front' of the engine is on the driver's side, and numbering them off from this end, the adjustment sequence is as follows:
1&6 open, check 3 (In.) 8 (Ex.)
2&4 open, check 7 (In.) 5 (Ex.)
3&8 open, check 6 (In.) 1 (Ex.)
5&7 open, check 2 (In.) 4 (Ex.)
Valve clearances can only be accurately checked with the engine cold.
1.0/1.1 Inlet 9. Exhaust 23 thou.
1.3 Inlet 10. Exhaust 22 thou.
Carburettor **
You should always check for stains around the outside of the carb float bowl or any other malfunction which could cause poor idling and performance.
There's a 'tamper-proof plug over the mixture screw which can be removed for adjustment - twiddle the screw slowly in either direction to obtain the fastest and smoothest idle, and readjust the idle speed on the throttle screw as necessary.
Front discs ***
The front pads can be checked for wear by looking through the small 'window' on the front of the caliper body.
If one or more of the pads is near the limit, all four pads should be replaced. If wear seems particularly uneven, check that the calipers are not seized against the sliders. The caliper is removed by removing the pins and pulling out the sliding wedges shown. Min pad thickness: 60 thou.
Rear drums ***
Wear can be checked through a slot on he backplate which is plugged with a small bung.
If the shoes have to be replaced, the central nut retaining the hub is removed. Replace one set of shoes at a time so you can use the other side as reference.
Once the shoes are fitted, the central nut should be tightened to 27 Ib-ft while rotating the drum, then slacken off a V4 turn. Min. lining thickness: 60 thou.
Captions -
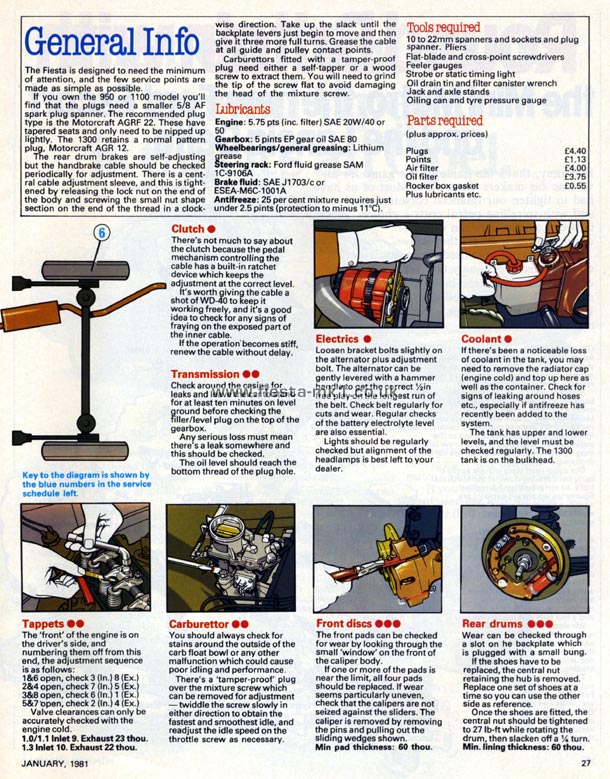
Middle-Left - Key to the diagram is shown by the blue numbers in the service schedule left.
|