Copy of Article Text Below
.....driveshafts, but what about the suspension. If you look at the supporting photos you'll see what's known as a Fiesta heavy duty suspension kit which is designed to give ultimate road performance. It consists of a new front crossmember, bolted to the existing item, and takes stronger tie bars which also have the facility for castor adjustment. A front roll bar is also included. This set up reduces drive under braking which apparently helps keep suspension angles constant. The other parts of the kit include Bilstein gas rear dampers and front struts equipped with camber adjustment and finally a pair of uprated road springs, although rally springs are also available should you require them (rear springs remain standard).
With all the extra power on tap the standard Fiesta braking isn'tquite up to it so an increased diameter disc kit has been developed, this being 1" larger than stock. Fitting is not quite as straightforward as it may first appear mainly because the caliper has to be relocated, but this is made easier as R.S. have developed a new mounting kit. Other parts necessary to make the 1600 conversion are a special front silencer box and a neat little servo brace which helps reinforce the existing mounting.
NITTY GRITTY
Having accumulated this selection of bits we were then faced with the task of fitting them. Quite clearly the biggest single job involved replacing the existing powerplant, although with two people working on it the task becomes much easier. Using a workshop manual as a guide, the whole engine/trans was dropped out of the bottom of the car with the crossmember removed. According to the manual this is the easiest way of going about it, otherwise you are faced with the task of dismantling the brake servo. When it came to knocking out the drive shafts special care was needed to ensure the bearings remained in situ, which was accomplished by mocking up a dummy drive shaft from a plug spanner and inserting this in the aperture.
With the engine out,the transmission can be parted from the block together with the clutch assembly and transferred to the new unit. We found it a good idea to paint the block while it was lying dormant and used Sperex Ford light blue, making a refreshing change from the original semi matt black finish. While we were at it the four branch exhaust manifold also got its fair share of Sperex heat resistant black.
After realigning the clutch and bolting up the trans we were then faced with a choice of refitting the new engine or working on the suspension. As a new front crossmember had to be fitted we decided to go the suspension route otherwise space would have been tight with the engine fitted. The new cross-member fits over the existing item and is made up of hefty 'L' shaped steel plate. Whilst helping greatly to beef up the front end it also provides a more rigid mounting point for the other suspension pieces such as the front anti roll bar and tie bars. When the crossmember was first offered up it didn't quite fit thanks mainly to two fillets on the edge of the existing crossmember interfering with the corners on the new one, so what you have to do is cut them off, or cut and bend out of the way, which ever is easier.
Right, now you can offer up the crossmember and using the collars, nuts and bolts supplied as well as the existing ones on the car, bolt it into position. Again, at this stage you could put the engine/trans back in the car if desired. We opted to work on the suspension and began to dismantle the front caliper, disc and strut assembly, these all came apart quite easily till we were left with each individual component, the strut and spring were to be replaced so they disappeared, likewise the front discs and tie bars also parted company. The only special tool necessary to put the new components together is a spring compressor and having assembled the 30% uprated Demon Tweeks road springs with new Bilstein front struts the rest of the components could now be put together.
DISC PROBLEMS
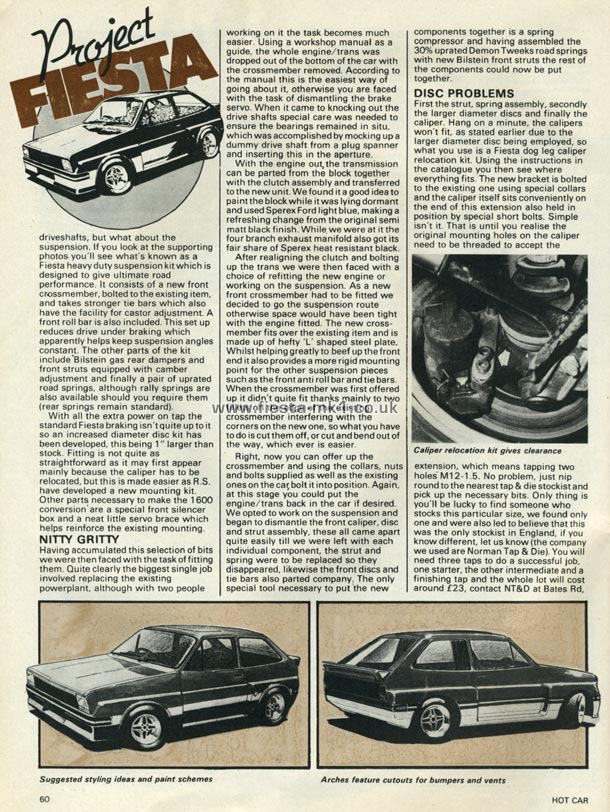
First the strut, spring assembly, secondly the larger diameter discs and finally the caliper. Hang on a minute, the calipers won't fit, as stated earlier due to the larger diameter disc being employed, so what you use is a Fiesta dog leg caliper relocation kit. Using the instructions in the catalogue you then see where everything fits. The new bracket is bolted to the existing one using special collars and the caliper itself sits conveniently on the end of this extension also held in position by special short bolts. Simple isn't it. That is until you realise the original mounting holes on the caliper need to be threaded to accept the extension, which means tapping two holes M12-1.5. No problem, just nip round to the nearest tap & die stockist and pick up the necessary bits. Only thing is you'll be lucky to find someone who stocks this particular size, we found only one and were also led to believe that this was the only stockist in England, if you know different, let us know (the company we used are Norman Tap & Die). You will need three taps to do a successful job, one starter, the other intermediate and a finishing tap and the whole lot will cost around £23, contact NT&D at Bates Rd,.....
Captions -
Middle-Left - Caliper relocation kit gives clearance
Bottom-Left - Suggested styling ideas and paint schemes
Bottom-Right - Arches feature cutouts for bumpers and vents
|


